


How to add a signature in Exchange: A step-by-step guide
12 November 2025
0 min read
TL;DR
- You can add a companywide email signature in Microsoft Exchange Server using mail flow (transport) rules
- The new Exchange Server Subscription Edition (SE) keeps this method but adds updated compliance and lifecycle support
- Signatures added this way appear at the bottom of emails and lack HTML flexibility
- IT admins can automate companywide branding, but limitations make third-party tools useful
- Exclaimer’s cloud solution centralizes control, compliance, and branding for any Exchange environment
Microsoft Exchange continues to power email for many organisations, but 2025 has marked a major shift. With support for Exchange Server 2019 now ended and Exchange Subscription Edition (SE) released, IT teams are reassessing how they manage core functions—like companywide email signatures.
This guide walks through how to add a global email signature in Microsoft Exchange using built-in mail flow (Transport) rules. It also explains what’s changed in the new Exchange SE release, where native tools fall short, and how centralized management simplifies everything.
Managing an Exchange Server email signature centrally also means end users can’t change the template. The signature is added after an email is sent, so you maintain control over your corporate brand and legal disclaimer.
6 easy steps to add a signature in Exchange
Follow the steps below to add a signature in Exchange. You will need to create your email signature template in HTML or plain text before starting.You can create an organization-wide email signature in Exchange using mail flow rules (also known as Transport Rules). The process is the same in Exchange 2016, Exchange 2019, and the new Subscription Edition (SE).
Important: This method only offers basic email signature management. To create and manage professional email signatures easily, consider our Exchange signature manager.
Open the Exchange Admin Center (EAC):
Sign in with admin credentials.
Go to Mail flow › Rules.
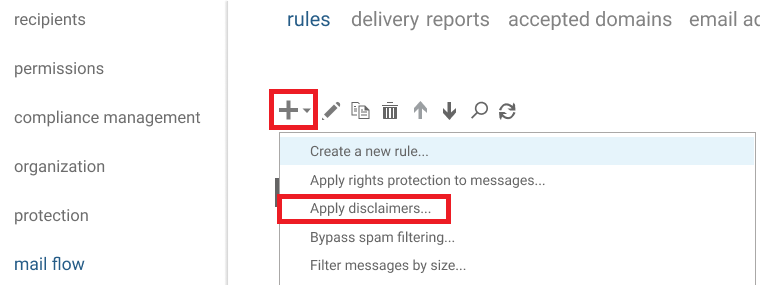
Create a new rule:
Select Add (+) › Apply disclaimers.
Name the rule—for example, Company Email Signature.
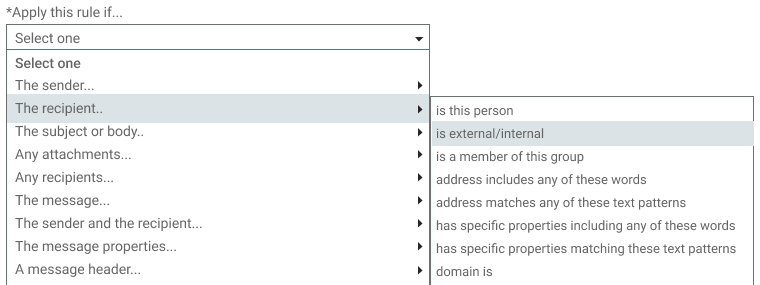
Set the conditions:
Under Apply this rule if…, choose [Apply to all messages].
Confirm the Apply a disclaimer to the message option is selected. If it's not:
Click on the drop-down menu for *Do the following…
Choose Apply the disclaimer to the message
Click append a disclaimer option
You can refine the rule later for specific users, groups, or domains.
Add your email signature content:
In Do the following, choose Append the disclaimer.
Enter your email signature in HTML format for proper layout and styling.
Use Active Directory attributes (like %%DisplayName%% or %%PhoneNumber%%) to pull in user details automatically.
Define the fallback action:
Under Select one…, choose what Exchange should do if it can’t add the signature:
Wrap: The signature is appended to a new email with the original message attached.
Ignore: The message is sent without an email signature. We recommend this option.
Reject: The email is not sent, and the sender receives an NDR.
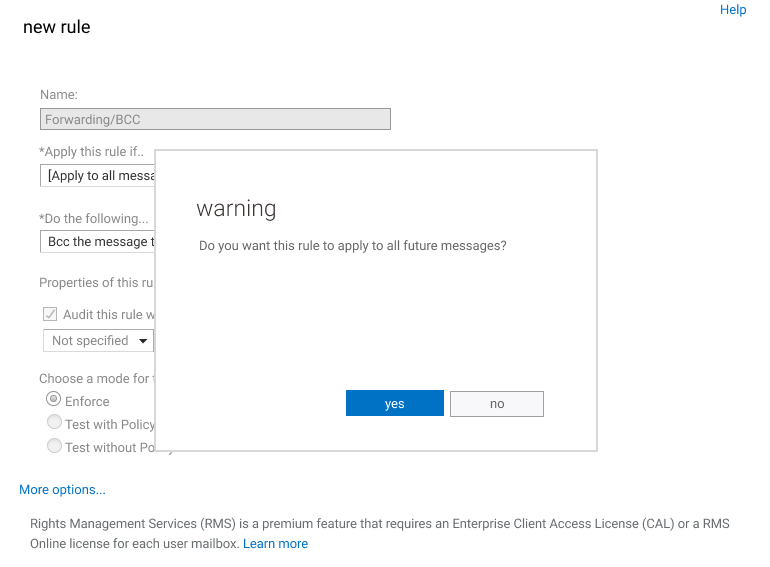
Save and test:
Click More options… to add additions like exceptions. For example, setting the signature to not apply to certain users in a group.
Once confirmed, click Enforce under Choose a mode for this rule.
Click Save to complete the setup. Choose Test… if you wish to review the mail flow rule’s actions.
Send a test email to see if your signature renders correctly. To update the configuration, highlight the rule and click the pen icon found next to Add (+).
Tip: In Exchange SE, these same steps apply. The admin interface has been refreshed, but mail flow rules work the same way.

The evolution of Exchange email signature management
Managing email signatures in Microsoft Exchange Server has become much easier compared to the early days of Exchange 2000 and 2003. Back then, adding a simple email disclaimer to outgoing messages required expertise in Visual Basic Script (VBS), making it a complicated task for IT administrators.
Exchange 2007
The introduction of Hub Transport Rules was a major step forward. For the first time, administrators could automatically append disclaimers to outgoing messages without scripting. It simplified the process, but designs remained basic—plain text only, with little control over layout or branding.
Exchange 2010
This version added real flexibility. Support for Active Directory attributes meant user details like name, title, or phone number could populate automatically. HTML and inline CSS became available through the “Specify disclaimer text” feature, making corporate signatures more consistent and professional.
Exchange 2013 and 2016
These releases refined Transport Rules with more conditions and actions, alongside improved data-loss-prevention controls. Administrators could now manage disclaimers through the Exchange Admin Center rather than the older Management Console, but the overall process for creating signatures stayed the same.
Exchange 2019
By 2019, Exchange had matured, yet its signature capabilities were still limited. Organisations could manage basic companywide disclaimers, but dynamic, visually branded signatures were still difficult to achieve natively.
Exchange Server Subscription Edition (SE)
On July 1, 2025, Microsoft launched Exchange Server Subscription Edition (SE)—a subscription-based successor to Exchange 2019. SE replaces one-off licensing with continuous updates, modern authentication, and ongoing security patches.
For email signatures, the mechanics remain familiar. SE still relies on mail flow (Transport) rules to apply organization-wide disclaimers and signatures. What changes is the lifecycle: updates will be delivered incrementally, meaning IT teams can expect a more stable, continuously supported platform.
The problems with managing Exchange email signatures natively
While Microsoft Exchange makes it possible to apply companywide email signatures through mail flow (Transport) rules, the native approach still comes with limitations that frustrate IT teams and limit branding potential.
1. Signatures appear at the bottom of email threads
Exchange always places disclaimers or signatures at the very end of an email chain. That means long conversations quickly become cluttered and inconsistent, with outdated signatures buried deep in replies and forwards.
2. No embedded images
Logos and banners can’t be attached directly. They must be hosted on a public web server, which increases dependency on external links and can trigger image blocking in some email clients.
3. Limited design flexibility
Exchange only supports basic HTML and inline CSS. Complex layouts, responsive templates, and brand-aligned designs are difficult to achieve natively.
4. No visual preview or editor
Administrators can’t preview signatures before deployment. Formatting must be tested manually, often requiring multiple iterations to correct alignment, spacing, or placeholder issues.
5. Static user data
Active Directory attributes populate correctly at first, but any data errors or outdated information flow straight into signatures. Without automation or sync checks, inconsistencies are hard to catch.
6. Inconsistent experience across devices
Server-side signatures apply only after emails are sent. Users won’t see their signature when composing messages in Outlook or on mobile devices, creating confusion and reducing trust in the final output.
7. Limited reporting and control
Native Exchange provides no analytics, version history, or audit trail. Tracking changes or confirming compliance requires manual checks and screenshots.
These limitations make native Exchange signatures suitable for basic disclaimers, but not for modern organisations that need consistent, professional communication across teams, regions, and devices.
Additional tips and tricks for adding an email signature in Exchange
Regularly review your mail flow rules to ensure they remain relevant and necessary. This helps maintain proper application of your email signature.
Test your Exchange email signature on different devices and email clients to confirm it appears consistent and professional.
If you encounter issues with a mail flow rule, restarting the Microsoft Exchange Transport service can often resolve minor problems.
To update your Exchange email signature template, modify the text under specify disclaimer text in the rule configuration. Then, test the changes before enforcing them to avoid formatting issues.
How Exclaimer improves email signature management for Exchange
Exclaimer offers the best way to manage Exchange email signatures. It’s so easy to use that non-technical teams can control email signatures for the whole organization, removing the need for IT to involve themselves in Exchange email signature management. The only requirement is for your local Active Directory to be synchronized with Azure AD.
Exclaimer can also be seamlessly migrated to Microsoft 365. So, when you migrate to the cloud, your email signatures transition seamlessly with you.
Centralized management: Manage every Exchange email signature across users, departments, and regions from a single cloud dashboard. Updates take minutes and apply automatically across all mailboxes and devices.
Automated compliance: Apply the right legal disclaimers by business unit, country, or department to meet internal and external compliance standards. Built-in version control helps legal and compliance teams track every change.
Consistent branding everywhere: Ensure every email sent through Exchange uses the correct logo, colour scheme, and layout—no matter where or how it’s sent. That consistency reinforces professionalism across every interaction.
Fewer IT support tickets: Routine update requests from other departments can be handled directly in Exclaimer, freeing IT from repetitive work. Role-based access control lets other teams make safe, approved changes without affecting overall governance.
Cross-device consistency: Email signatures are applied server-side, so they appear correctly on desktop, mobile, and webmail clients. Employees see the same Exchange email signature everywhere, without needing to set it up themselves.
Analytics and reporting: Track engagement with banner campaigns, monitor click-throughs, and see how signature updates perform over time. Real-time insights help both IT and marketing understand the value of each send.
Nothing to install: Exclaimer doesn’t require any installations or downloads. Email signatures are created and managed via a web portal which can be accessed from anywhere. This makes managing signatures much simpler, as you’re not restricted to one device.
Office 365 ready: The only requirement to use Exclaimer is for an organization’s local Active Directory to be synchronized and configured with Azure AD. However, it's designed to be a future-proof solution, for easy migration to Office 365 (Microsoft 365). When you decide to migrate to the cloud, your email signatures will transition seamlessly with you.

Compare Exclaimer with Exchange email signature features
Let’s see how managing Microsoft Exchange signatures in Exclaimer compares to just using the in-built editor in Microsoft Exchange.
| Features | Exclaimer | MS Exchange |
|---|---|---|
| Allows entry of HTML | ✓ | ✓ |
| Allows entry of Plain Text | ✓ | ✓ |
| Allows multiple policies per email | ✓ | ✓ |
| Create signatures with a disclaimer/marketing message inline | ✓ | ✕ |
| Separate signatures for new messages and replies | ✓ | ✕ |
| Take contact details from Azure Active Directory (AAD) | ✓ | ✕ |
| Email signatures updates automatically applied | ✓ | ✕ |
| Give signatures to individual users, departments, etc. | ✓ | ✕ |
| Suppress missing contact information where appropriate | ✓ | ✕ |
| Schedule signatures with a time-and-date range | ✓ | ✕ |
| Test which signature will apply for a certain user | ✓ | ✕ |
| Full HTML signatures on all devices including mobiles | ✓ | ✕ |
| Force default branding & consistency | ✓ | ✕ |
| Embedded images on emails when sent from any device | ✓ | ✕ |
| Apply signatures based on domain or email address | ✓ | ✕ |
| See signatures while composing an email in Outlook | ✓ | ✕ |
| Drag-and-drop signature designer | ✓ | ✕ |
| Manage via a web browser | ✓ | ✕ |
| Automatic updates/upgrades | ✓ | ✕ |
| Can display personalized contact details in any font | ✓ | ✕ |
| Give editor or admin permissions to specific users | ✓ | ✕ |
| Guarantee use of your custom font/s | ✓ | ✕ |
| Group signatures into folders and add restrictions/rules | ✓ | ✕ |
| Hosted exclusively in Azure | ✓ | ✕ |
| Share access with users in non-IT departments | ✓ | ✕ |
| No service account or local installations require | ✓ | ✕ |
| Supports Multi-Factor Authentication | ✓ | ✕ |
| Multi-lingual interface | ✓ | ✕ |
| Use email signatures with Microsoft 365 and on-premises Exchange | ✓ | ✕ |
If your IT team spends time troubleshooting layouts, fixing missing logos, or managing updates for multiple departments, Exclaimer delivers immediate value.
It simplifies workflows, strengthens compliance, and ensures every email reflects your brand consistently—without constant admin effort.
Choose the best Exchange email signature software
From Exchange 2000 to the new Subscription Edition (SE), Microsoft has steadily improved how organizations handle companywide email signatures. But even with these updates, native mail flow rules still leave gaps—limited HTML support, static layouts, and no visibility across devices.
Exclaimer email signature software guarantees that every email sent by your organization will have a full HTML email signature with static text, imagery and dynamic fields. That means any email from any device or client, including mobile devices like smartphones and tablet PCs.
Learn more and sign up for a free trial today.